I expect you remember that we are reading 'The Iron Man' by Ted Hughes
I expect you also remember that we had a go at making our own 'Iron Men'
Well, here they are.....
If you like what you see, why not pay someone a compliment?
Showing posts with label shapes. Show all posts
Showing posts with label shapes. Show all posts
25 January 2008

17 January 2008
The Iron Man
We have begun reading 'The Iron Man' by Ted Hughes
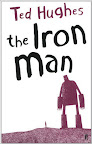
The Iron Man fell off the cliff and broke into pieces. However, he was able to put himself together again; apart from his ear, which had been found by seagulls and put in their nest. We think he was looking for his missing ear when he walked down, down, down into the sea again and disappeared, with his eyes flashing.
In today's episode, the Iron Man came back. Hogarth spotted him back on the edge of the cliff when he was doing some fishing. Of course he was scared and he ran back home. He told his father what he had seen.
Now, if you told your father that you had seen an Iron Man as big as a house with feet the size of a single bed, what would he have said? But Hogarth's father believed him! He believed him because he had seen the evidence.....
The evidence was a tractor in the yard that had been BITTEN in half! There were teeth marks to prove it. There was other evidence too; chewed up diggers and bulldozers, a half-eaten bicycle wheel and a piece of a mud-guard.
All the farmers from round about decided to make a trap for the Iron Man. And this is what they did.....They dug a huge hole, as deep as three trees with steep sides. They covered it with branches and straw and then earth, so that it looked just like a ploughed field. On the far side of the trap they placed the bait. This was a rusty (but tasty looking) lorry. They hoped the Iron Man would be tricked and fall into the trap on his way to eat the bait, but so far, he has not reappeared.....and we have to wait for the next exciting episode to find out what happens next.
But in the meantime, we got thinking about the things that the Iron Man might have enjoyed for his supper. We know that he likes things made from IRON and STEEL (which are both metal).
In art we made our own Iron Man. We sketched him on paper first. Then we looked at the different shapes we had drawn; we saw squares, rectangles, semi-circles. We cut out the shapes we wanted to use for the body parts from metal foil and used other metal things for his eyes, ears and hands. We used paper clips, thumb tacks and staples and we even provided him with tasty metal snacks, in case he got hungry. But the best fun of all was searching through Momo's bucket of screws, nails and rivets to see what else we could find that might be useful.......................
Take a look at the process in our slide-show.
The Iron Man fell off the cliff and broke into pieces. However, he was able to put himself together again; apart from his ear, which had been found by seagulls and put in their nest. We think he was looking for his missing ear when he walked down, down, down into the sea again and disappeared, with his eyes flashing.
In today's episode, the Iron Man came back. Hogarth spotted him back on the edge of the cliff when he was doing some fishing. Of course he was scared and he ran back home. He told his father what he had seen.
Now, if you told your father that you had seen an Iron Man as big as a house with feet the size of a single bed, what would he have said? But Hogarth's father believed him! He believed him because he had seen the evidence.....
The evidence was a tractor in the yard that had been BITTEN in half! There were teeth marks to prove it. There was other evidence too; chewed up diggers and bulldozers, a half-eaten bicycle wheel and a piece of a mud-guard.
All the farmers from round about decided to make a trap for the Iron Man. And this is what they did.....They dug a huge hole, as deep as three trees with steep sides. They covered it with branches and straw and then earth, so that it looked just like a ploughed field. On the far side of the trap they placed the bait. This was a rusty (but tasty looking) lorry. They hoped the Iron Man would be tricked and fall into the trap on his way to eat the bait, but so far, he has not reappeared.....and we have to wait for the next exciting episode to find out what happens next.
But in the meantime, we got thinking about the things that the Iron Man might have enjoyed for his supper. We know that he likes things made from IRON and STEEL (which are both metal).
In art we made our own Iron Man. We sketched him on paper first. Then we looked at the different shapes we had drawn; we saw squares, rectangles, semi-circles. We cut out the shapes we wanted to use for the body parts from metal foil and used other metal things for his eyes, ears and hands. We used paper clips, thumb tacks and staples and we even provided him with tasty metal snacks, in case he got hungry. But the best fun of all was searching through Momo's bucket of screws, nails and rivets to see what else we could find that might be useful.......................
Take a look at the process in our slide-show.
06 December 2007
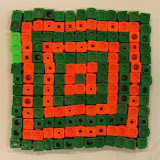
We started with a green cube and then built a square of orange cubes around it. Then we made another square of green cubes and so on...
We decided to count the number of cubes in each square.
The first square of orange was made using 8 cubes.
The next square of green had 16 cubes.
We tried to guess how many cubes the next square would need. Here are some of the numbers we thought: 14, 20, 90, 26, 27, 19, 18, 30...
So we counted very carefully; we found out that...
The next orange square had 24 cubes.
We wondered if we might be able to find a pattern...
We put 8 in our heads and counted until we got to 16; we found that the difference was 8
We put 16 in our heads and counted until we got to 24; we found that the difference was 8 (again!)
The next green square had 32 cubes
We put 24 in our heads and counted until we got to 32; we found that the difference was 8 (again!)
The next orange square had 40 cubes
We put 32 in our heads and counted until we got to 40; we found that the difference was 8 (again!)
The last green square had 48 cubes
We put 40 in our heads and counted until we got to 48; we found that the difference was 8 (again!)
How many orange cubes do you think will we need to make the next square? How could you find out? Does your answer follow the pattern we found?
What are some things you could say about this pattern?
 |
| maths investigat |
We decided to count the number of cubes in each square.
The first square of orange was made using 8 cubes.
The next square of green had 16 cubes.
We tried to guess how many cubes the next square would need. Here are some of the numbers we thought: 14, 20, 90, 26, 27, 19, 18, 30...
So we counted very carefully; we found out that...
The next orange square had 24 cubes.
We wondered if we might be able to find a pattern...
We put 8 in our heads and counted until we got to 16; we found that the difference was 8
We put 16 in our heads and counted until we got to 24; we found that the difference was 8 (again!)
The next green square had 32 cubes
We put 24 in our heads and counted until we got to 32; we found that the difference was 8 (again!)
The next orange square had 40 cubes
We put 32 in our heads and counted until we got to 40; we found that the difference was 8 (again!)
The last green square had 48 cubes
We put 40 in our heads and counted until we got to 48; we found that the difference was 8 (again!)
How many orange cubes do you think will we need to make the next square? How could you find out? Does your answer follow the pattern we found?
What are some things you could say about this pattern?
29 November 2007
Spirograph patterns
We had a look at some amazing patterns a little like the one you see below.
Created by Anu
Garg.
Created by Anu
Garg.
Ours were made using a machine called a ‘Spirograph’.
Some of our parents made the same kinds of patterns when they were young!
Patricia noticed that the name 'Spirograph' sounded a bit like the word spiral. That got us thinking and we all watched carefully as a ‘Spirograph’ pattern was made using the machine. As we watched we saw the pencil moving round in a curved, spiral shape.
We had a go at making our own but we made them in a different way.
How do you think we did ours? Look carefully.
Can you work it out?
You should be able to see one shape repeated lots of times
What shapes do you see?
16 November 2007
Cheesy jammy chequerboards
First take two slices of bread. Spread one thickly with jam and the other with cream cheese. Engage willpower and try not to take a bite.....just yet.
Next, cut each slice into three strips. Turn and cut again into three strips. You should end up with 12 white squares and 12 red ones.
Now use your squares to make a chequerboard pattern. Admire your work, pose for the inevitable photo and eat. Yum.
Sorry mum if appetites were spoiled!
Next, cut each slice into three strips. Turn and cut again into three strips. You should end up with 12 white squares and 12 red ones.
Now use your squares to make a chequerboard pattern. Admire your work, pose for the inevitable photo and eat. Yum.
Sorry mum if appetites were spoiled!
08 November 2007
Pass it on.....
Do you want to know how to play the game 'Pass it on'?
First, get together with about five or six friends. Then think of a shape or symbol that you can paint over and over again. Next choose the colour you would like to paint your shape. Then collect a long narrow strip of paper.
Now, paint your chosen shape onto one end of the paper (your friends will all be doing the same as you, but with their own choice of shape and colour). When everyone has finished, you all say 'Pass it on' as you pass your paper to the left.
You then have to paint the same shape on your neighbour's paper, right next to their shape and again you 'Pass it on' when everyone is ready. You should keep on going until the strip of paper is full of different coloured shapes and symbols; just paint your shape and 'Pass it on'.
When you have finished, see if you can spot any patterns. How many different symbols do you see? Are there the same number of different shapes as the number of people who played the game with you? Do all the strips look the same? If not, why do you think this is? How can you line up the strips so the pattern continues?
Here are some 'Pass it on' patterns that we made this afternoon.
Could you think of another way to play 'Pass it on'? Why not try it out with your friends?
First, get together with about five or six friends. Then think of a shape or symbol that you can paint over and over again. Next choose the colour you would like to paint your shape. Then collect a long narrow strip of paper.
Now, paint your chosen shape onto one end of the paper (your friends will all be doing the same as you, but with their own choice of shape and colour). When everyone has finished, you all say 'Pass it on' as you pass your paper to the left.
You then have to paint the same shape on your neighbour's paper, right next to their shape and again you 'Pass it on' when everyone is ready. You should keep on going until the strip of paper is full of different coloured shapes and symbols; just paint your shape and 'Pass it on'.
When you have finished, see if you can spot any patterns. How many different symbols do you see? Are there the same number of different shapes as the number of people who played the game with you? Do all the strips look the same? If not, why do you think this is? How can you line up the strips so the pattern continues?
Here are some 'Pass it on' patterns that we made this afternoon.
Could you think of another way to play 'Pass it on'? Why not try it out with your friends?
01 November 2007
Spinning around.....in art

We noticed that spiral shapes are all around us:
Sunflower seeds grow in a spiral shape
Snail shells grow in a spiral shape
Sometimes the weather makes a spiral shape, like hurricanes.
Some fossils are spiral-shapedSunflower seeds grow in a spiral shape
Snail shells grow in a spiral shape
Sometimes the weather makes a spiral shape, like hurricanes.
What other things have a spiral shape?
Click on the link to find out.This is how we made our own:
We chose red or black or white paper.
We had red, black and white paint.
We found interesting things to dip into the paint to make our spirals, like unifix cubes, clothes pegs, the 'wrong' end of the paint brush.
Subscribe to:
Posts (Atom)


